Lindsey Racing is your 24/7/365 source for Front Engine 4 Cylinder Porsche Parts     Lindsey Racing is your 24/7/365 source for Front Engine 4 Cylinder Porsche Parts    
Filters

Secure Checkout
Your Shopping Cart Is Empty

Secure Checkout

Shop M-TUNE MAF KIT

M-TUNE INSTALLATION & INFORMATION

Please read through the following instructions completely to make sure you do not overlook any of the required procedures for the complete and safe installation of the M-Tune kit.

CHIP BOARD SETTING


When ordering the M-Tune, you were required to select a Tune file to be initially installed on the DME chip by us. Those different tune files were based on engine displacement and fuel injector size. Each of those Tune Files contained multiple maps for different fuels and running modes such as valet. In order to select the appropriate map or maps for the M-Tune to operate on, you need to set the DME Chip Board Dip Switch up.

The current list of tune files are the following.

  • Tune 1 - 2.5L w/ 80# Injectors
      1) 80# injector, pump gas // 2) 80# injector, race gas
      3) 80# injector, pump gas // 4) 80# injector, E85
      5) 80# injector, pump gas // 6) 80# inj, pump gas, valet
      7) 80# injector, E85 // 8) 80# inj, E85, valet
      9) 80# injector, pump gas, emissions // 10) 80# injector, E85, emissions
      11) stock injector, pump gas // 12) stock injector, pump gas, emissions
      13) stock injector, pump gas, AFM // 14) stock injector, pump gas, AFM, emissions
  • Tune 2 - 2.5L w/ 160# Injectors
      1) 160# injector, pump gas // 2) 160# injector, race gas
      3) 160# injector, pump gas // 4) 160# injector, E85
      5) 160# injector, pump gas // 6) 160# inj, pump gas, valet
      7) 160# injector, E85 // 8) 160# inj, E85, valet
      9) 160# injector, pump gas, emissions // 10) 160# injector, E85, emissions
      11) stock injector, pump gas // 12) stock injector, pump gas, emissions
      13) stock injector, pump gas, AFM // 14) stock injector, pump gas, AFM, emissions
  • Tune 3 - 2.8/3.0L w/ 80# Injectors
      1) 80# injector, pump gas // 2) 80# injector, race gas
      3) 80# injector, pump gas // 4) 80# injector, E85
      5) 80# injector, pump gas // 6) 80# inj, pump gas, valet
      7) 80# injector, E85 // 8) 80# inj, E85, valet
      9) 80# injector, pump gas, emissions // 10) 80# injector, E85, emissions
      11) stock injector, pump gas // 12) stock injector, pump gas, emissions
      13) stock injector, pump gas, AFM // 14) stock injector, pump gas, AFM, emissions
  • Tune 4 - 2.8/3.0L w/ 160# Injectors
      1) 160# injector, pump gas // 2) 160# injector, race gas
      3) 160# injector, pump gas // 4) 160# injector, E85
      5) 160# injector, pump gas // 6) 160# inj, pump gas, valet
      7) 160# injector, E85 // 8) 160# inj, E85, valet
      9) 160# injector, pump gas, emissions // 10) 80# injector, E85, emissions
      11) stock injector, pump gas // 12) stock injector, pump gas, emissions
      13) stock injector, pump gas, AFM // 14) stock injector, pump gas, AFM, emissions

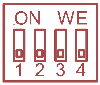
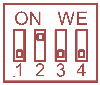
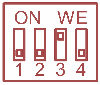
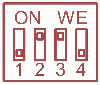
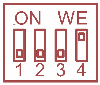
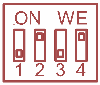
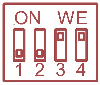
The DME Chip Board has a small Dip Switch located on it and needs to be set to the appropriate position to select the maps that you want to run. Let's use the following example.

Lets say you selected Tune 1 (2.5L and 80# Injectors) when ordering the kit and you want the run maps 3 & 4 for Pump & E85 Fuels. You would use the Tunes 3 & 4 position pictured below to set your Dip Switch to on the Chip Board appropriately.

Tunes 1 & 2 Position
Tunes 3 & 4 Position
Tunes 5 & 6 Position
Tunes 7 & 8 Position
Tunes 9 & 10 Position
Tunes 11 & 12 Position
Tunes 13 & 14 Position

Since your dip switch position is now set to run a specific pair of maps with a odd and even number, by default it runs on the odd number map. So if running Tunes 13 & 14, it will run on tune 13. By installing the supplied jumper wire into the coding plug on the DME harness, it will engage or run on the even numbered map, or in this case map 14. If you cut the supplied jumper wire and install a toggle switch there, you can toggle back and forth between map 13 and 14 with the flip of a switch. You may want to locate this switch in a not so obvious spot to keep unwanted hands off of it.

THE MAP SENSOR


The MAP sensor has a vacuum/boost port on its underside. This port needs to be connected to the port on the intake manifold. Typically, T-ing off of the vacuum line going to the fuel pressure regulator provides good results. Additionally, the length of tubing from the MAP sensor to the intake manifold should be kept less than three feet long. This helps keep the MAP sensor response time very fast.

The MAP sensor comes with a three-wire harness, that is color-coded:

MAP Sensor DME
Red (5v) #9 Green/Yellow
Black (ground) #28 Black (Engine side of cut)
Green (signal) #28 Black (DME side of cut)

The MAP sensor harness is long enough to place the sensor in the engine-bay and run the wires through the firewall boot/seal to the DME.

The Red power wire is tapped, that is - do not cut the DME's respective wire, just remove some of the DME wires insulation and connect the MAP sensor wire. As always, we recommend soldering, not T-type or "vampire" clips. A poor connection here can significantly reduce the MAP sensor signal.

For the Green signal wire, the DME wire 28 needs to be cut, and then connect the MAP sensor Green wire to the wire going to the DME. Then connect the MAP sensor Black wire to the cut wire that goes towards the engine.

***The DME wiring colors could be different depending on the build date of your car***

Here is a quick visual to follow:


Now that the MAP sensor is wired in, a simple voltage check will confirm that it is working properly:

With the ignition on, measure the voltage on the red wire to ground. You should see +5volts.

Now measure the voltage on the green wire. This should read ~1.6 volts (this will vary slightly depending on altitude).

If either wire does not read correctly, double-check your connections and that they are going to the proper wires in the DME harness.

MOUNTING THE MAF SENSOR


THE DME PLUG


In order to properly identify DME's pin # 28, it is necessary to disassemble the DME plug. Once the cover is off, the pin numbering becomes visible:

Once you remove the small screw on the end, the back of the plug will slide off unveiling the numbers seen here boxed in green. Locate #28 and that's your wire.


Pin # 28 tends to be black on the 951. Double-check that you cut the correct wire by using a volt-ohm meter to verify continuity between pin # 28 and the wire you plan on cutting!

MODIFYING THE DME


The second step necessary to install the MAP Sensor is removing/cutting a resistor in the DME itself. This is necessary for the DME to properly read the MAP sensor. The resistor on the same side of the DME that the EPROM is. If you are comfortable with soldering you can de-solder the resistor and remove it. Alternatively, you can simply cut one of the resistors legs, and bend the resistor out of the way - making sure it does not come into contact with the DME board:


Depending on the year of your DME, the body of the resistor might be a different color.

***Cutting/removing this resistor does not affect normal function of the DME, regardless of software***

FUEL PRESSURE


The fuel system needs to be set at 3.0 bar (43 psi). You can do this with the fixed rate Bosch 3.0 bar fuel regulator or by an adjustable fuel regulator that is set to 43 psi with the car idling and the vacuum hose temporarily disconnected from the fuel regulator. Reconnect the vacuum hose once the pressure is set.

DME FQS SWITCH


This new M-Tune has new FQS (Fuel Quality Switch) values which are different from the stock values you may be used to seeing and there is no ignition timing adjustment, only fuel.

DME Switch Position Fuel % Change
0 0%
1 +3.6%
2 -3.6%
3 +8%
4 -8%
5 +11.6%
6 -11.6%
7 +16.1%

If you're not familiar with the DME FQS switch, you can learn more about it Here . Ignore the FQS settings on this page as they are for stock DME's, not ones running the the M-Tune. Those setting are on the chart above.

24 PIN TO 28 PIN DME CONVERSION


The M-Tune requires a 28 Pin DME. If you have a 24 Pin DME, it can be modified to accept the 28 Pin Chip Board. Either Lindsey Racing can perform the modification for you for a price of $50, or you can request the parts from us to do the modification yourself.

The conversion procedure requires 3 steps.

1. Solder in the additionl pair or pins (allows you to install the 28 pin chip board)

2. Install a jumper wire (tells the DME that it now needs to recognize the 28 pin chip)

3. Cut a transistor (required for the addition of the MAP sensor)

To download the procedure for the DME modification, CLICK HERE .

Top

INTERNATIONAL ORDERING


TO OUR INTERNATIONAL CUSTOMERS:


In the past, we have used a separate order form for placing International orders. We have quit using that process and are requiring all customer to use the shopping cart system built into the web site and it's check out process.

If you simply want a quotation and are not ready to place an order, then cut and paste the contents of your shopping basket, take a screen shot of the basket, or make a list of items and send us a email requesting a quotation with shipping.

If you need shipping prices before you make your final decision to purchase, then you should request that quotation by email and not use the shopping cart checkout process because you will be paying for the parts at that time.

Since our shopping cart and shipping estimator will "NOT" correctly calculate shipping charges on International Orders, we have it set-up to where the shipping will be Zero Dollars ($0.00) when checking out. When the shopping carts address process learns you are not in the United States by selecting your particular country, that's when it switches to equal Zero. That does NOT mean shipping is free.

Upon completion of the check out process, you will have paid for your parts but NOT the shipping on those parts.

Once we look over your parts ordered and calculate shipping weights and box sizes, we will send you an E-Mail with at least one shipping option and maybe several. We utilize UPS, DHL and the United States Postal Service (USPS) to deliver your parts.

Once you pick a shipping carrier and agree to the quotation by returning the E-Mail, we will be sending a PayPal money request for the amount of the shipping to be collected. If the parts are expected to be shipping out quickly, then you may receive that email quickly. If the parts are going to need to be built or something is on back order from the list of parts, we may hold off sending that E-Mail until we have the shipment ready to go. It can vary from order to order as to how we do that. If you think you should be hearing from us quickly, but you don't, feel free to contact us.

If you have special shipping needs or requirements, during the checkout you will see a SPECIAL ORDER INSTRUCTIONS window. Enter that special information there.

A good bit of our business is International and we have been taking care of those valued customers since 1999.

Top

TURO LEVANEN

'88 944 TURBO S 3 Liter Street Legal Track Racer!

This car is the only one driven both daily on the street and in the Nordic Porsche Sports Cup series.


Engine Mods Include:

3 Liter 968 block bored to 105 mm
LR 65 Turbocharger (LR)
3” to 5” exhaust (LR)
Stainless steel 3” downpipe (LR)
Sport headers (LR)
Catcam cam
Link engine management and all new electrical wiring
Old mechanical rotor ignition changed to coil pack / EMS / digital ignition with new TDC measuring
Flex fuel for 85 ethanol to 98 gas--all mixtures go
Head with 48 mm intake valves
Comet 3 layer head gasket (LR)
140# valve springs (LR)
5 angle seat grind
Larger Intercooler with aluminum hardpipes w/ silicone hoses
LR silicon water hoses
LR fuel rail with 92 lb injectors
Intake Manifold – extrude honed and polished
Racing fuel pump with new hoses
Tial 38mm wastegate
Solenoid over boost controller. Two programs (1.0-1.3 bar). 400 hp-500 hp
Wössler pistons (105 mm 8.5:1 compression) LR
Pauter con rods LR
Light battery in race mount and cut-off switch
Silicon vacuum lines LR
Rod bearings, main and balance shaft bearings Calico metal coated
Oil Pan and Balance Shafts Reseal
Recent radiator, water pump, rollers, belts etc. new – Gates Kevlar/Blue Timing belt
Approx. max horsepower 480 rwhp with 720 Nm torque (531 ft/lb) with substantial dyno hours


Driveline/Transmission:

SPEC Stage 3 Clutch LR
Heavy duty motor mounts
Heavy duty trans. mounts
Recent Clutch Master/Slave with hoses
Heavy duty drive shafts LR
Torque tube with heavy duty bearings
Quaife mechanical differential
All wheel and drive shaft bearings new
All bushings non-OEM


Brakes:

GT3RS 997 brakes and 350 mm slotted and cross drilled rotors
Turbo s rear brakes
Brake bias valve changed


Suspension:

Koni Sport Front
Koni Series 30 racing rear
Front 500 lbs coil springs
Rear 900 lbs coil springs
Adjustable front camber plates
M035 sway bars LR
Elephant Racing Polybronze spring plate bushings
Poly bushings everywhere else
Front solid bushing ball joint kit
Strut tower bar
Lower caster block bar
New front and rear wheel bearings
Recent race alignment and corner balance


Body:

Front/Rear tow hooks
Fire extinguisher system in cabin and engine bay
Fender flares
GT3 front splitter
Rear diffuser in process
968 rear lights and bumper carbon fibre
Sunroof removed (GT parts)
997 gt2 rear wing
Glass fibre hood
Plastic rear window


Interior:

Sparco/GT3 Speed Seats (R & L) in black
Porsche GT3 Steering Wheel and hub
Sparco 6pt cam lock harnesses (R & L)
Geiko racing approved gauge
Stock seat belts remain functional
Track Mats, steel plates and Lightened pedals aluminum
Extra long shifter stick and short shifter
Electrical boost control 2 programs – center console
A/F meter-center console
Fuel pressure meter
Boost meter
Racing “kill” switch in cabin
Full fire ext. system cabin and engine bay with external switch
Back seat delete
Top

INTERNATIONAL ORDERING


TO OUR INTERNATIONAL CUSTOMERS:


In the past, we have used a separate order form for placing International orders. We have quit using that process and are requiring all customer to use the shopping cart system built into the web site and it's check out process.

If you simply want a quotation and are not ready to place an order, then cut and paste the contents of your shopping basket, take a screen shot of the basket, or make a list of items and send us a email requesting a quotation with shipping.

If you need shipping prices before you make your final decision to purchase, then you should request that quotation by email and not use the shopping cart checkout process because you will be paying for the parts at that time.

Since our shopping cart and shipping estimator will "NOT" correctly calculate shipping charges on International Orders, we have it set-up to where the shipping will be Zero Dollars ($0.00) when checking out. When the shopping carts address process learns you are not in the United States by selecting your particular country, that's when it switches to equal Zero. That does NOT mean shipping is free.

Upon completion of the check out process, you will have paid for your parts but NOT the shipping on those parts.

Once we look over your parts ordered and calculate shipping weights and box sizes, we will send you an E-Mail with at least one shipping option and maybe several. We utilize UPS, DHL and the United States Postal Service (USPS) to deliver your parts.

Once you pick a shipping carrier and agree to the quotation by returning the E-Mail, we will be sending a PayPal money request for the amount of the shipping to be collected. If the parts are expected to be shipping out quickly, then you may receive that email quickly. If the parts are going to need to be built or something is on back order from the list of parts, we may hold off sending that E-Mail until we have the shipment ready to go. It can vary from order to order as to how we do that. If you think you should be hearing from us quickly, but you don't, feel free to contact us.

If you have special shipping needs or requirements, during the checkout you will see a SPECIAL ORDER INSTRUCTIONS window. Enter that special information there.

A good bit of our business is International and we have been taking care of those valued customers since 1999.