Lindsey Racing is your 24/7/365 source for Front Engine 4 Cylinder Porsche Parts     Lindsey Racing is your 24/7/365 source for Front Engine 4 Cylinder Porsche Parts    
Filters

Secure Checkout
Your Shopping Cart Is Empty

Secure Checkout

Shop CRANK SENSOR HARNESS

CRANK SENSOR HARNESS INSTALL 944T

In the following instruction, we are installing a Crankshaft Reference Sensor Harness into the 944 Turbo harness. The 944 would be performed the same way.

This factory wiring harness happens to be out of the car. Many of you would be installing this reference sensor harness with the factory wiring harness still in the car. All steps would be the same. You just do your work under the hood, and under the dash. It is not necessary to remove the factory harness and we advise against it unless you're pulling the engine at the same time.

If you need help finding the DME and KLR, and need help locating connectors, refer to the DME & KLR Chip Install instructions. This will show you where they are and how to access them.

Step #1 "Position & Placement of Harness"


Lay out and position the new Reference Sensor Harness so that the plugs are in the same location or length from the main harness as the old plugs.
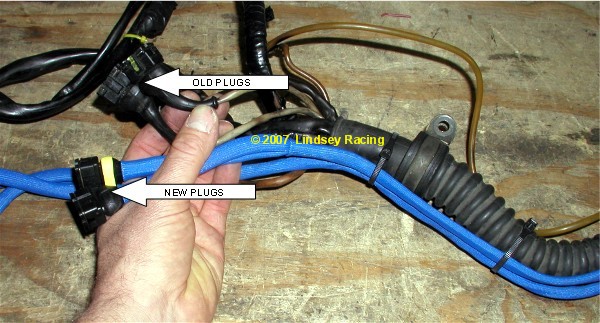


Step #2"Through the Firewall"


You will need to pass the new Reference Sensor Harness through the firewall into the car. A good location to do this is through the large rubber firewall boot/seal. You can poke a hole through it with a small Phillips screwdriver, then use a knife to make a "+" type cut. Just large enough to allow you to push the wires through. It may work better to pull the wires through by taping onto a coat hanger wire or screwdriver from the foot well side of the boot then pulling them through.

This harness pictured already had our Fuel Injector Harness installed which is why you see two new harnesses.
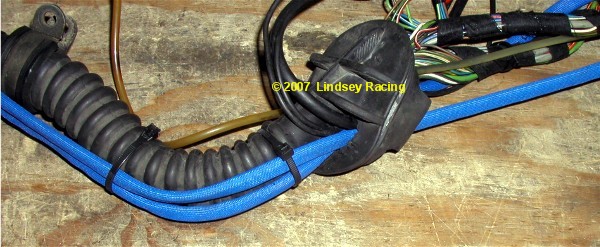


Step #3 "Disassemble DME Plug"


Remove the small straight blade screw on the end of the DME plug. Roll back or slide the Rubber Boot on the opposite end.
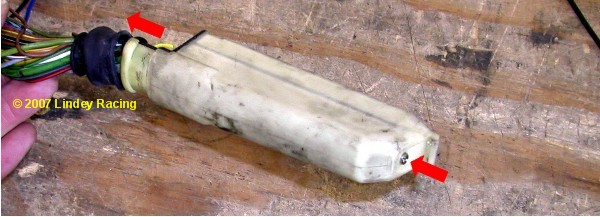


Step #4 "Slide DME Connector Cover Off"


Just like it says. Slide the cover off as shown.
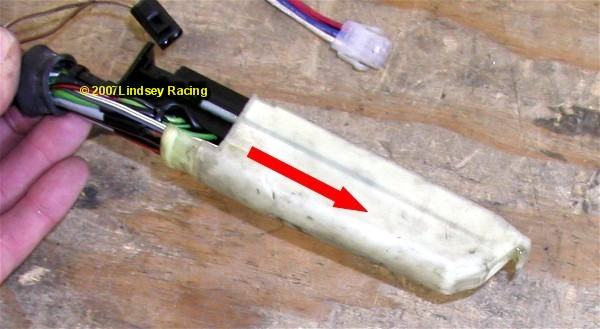


Step #5"Locate DME Pin Numbers"


The DME pin numbers are located down both sides of the DME plug. On this side you see the numbers 1 thru 18, on the other side is 19 thru 36.

We will be working with wires at pin numbers 5, 8, 25, 26, 27 and 23.
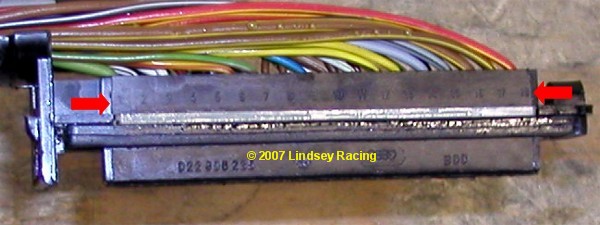


Step #6 "Remove Pin Retaining Rail"


Simply remove this light green colored pin retaining rail from both sides of the plug. This keeps the pins locked into place. Without removing this, you cannot remove the original wires which is the next step.


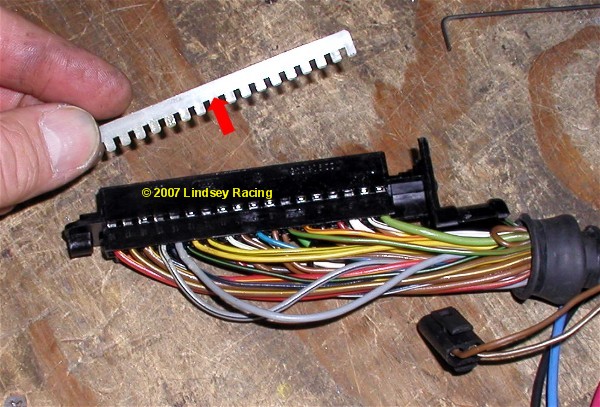
Step #7 "Remove Wires Pin #'s 5, 8, 25, 26 and 27.


If you study the new wire terminals on the Reference Sensor Harness, you will notice a small tang or tab that springs out of the side of the terminal that works like a fish hook. This must be depressed in order to remove the old pin/wire from the DME plug. There is a small square area or access point on the side of the terminal pin. If you slide a small object down this hole such as a small Allen wrench, small screwdriver (like the one you get in a eye glass repair kit) or even a heavy paper clip, you can depress this tab. Once depressed, you can simply pull the wire out from the other side. This is the hardest part of the job. They can be a little stubborn. You might try pushing the wire in tight, at the same time your trying to depress the tab. Then pull on the wire. Once you get the first one out, the second will probably take you seconds.

There is actually a tool for this, but most people have something around the house or tool box that will work.

Remove pin/wires from slots #5, 8, 25, 26 & 27.
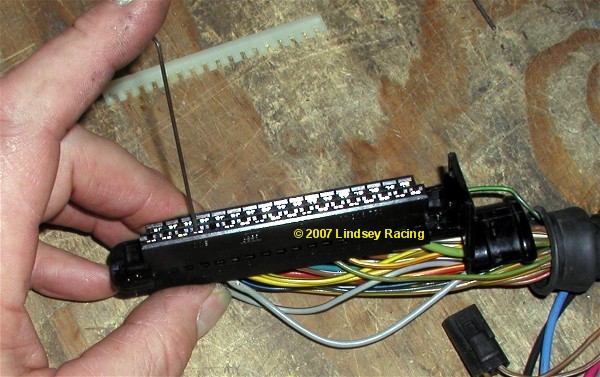


Step #8 "Clip Brown Ground Wire"


On DME pin #5, there are two wires attached to the original terminal. A ground wire (black) for the old reference sensor, and a chassis ground wire (brown). We need to cut the brown wire just after the terminal as shown here.
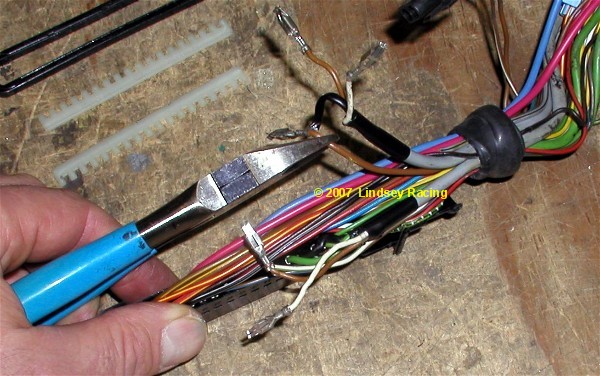


Step #9 "Clip Black Ground Wire"


The ground wire on the second or other old reference sensor wire (black) ties into pin #23 along with a ground from the O2 sensor (also black). We need to cut the black wire which is the reference sensor ground wire loose from the other black wire. We leave the pin #23 in the DME plug with the 02 sensor ground remaining, and just cut the black wire as shown from the reference sensor wire.

Our new reference sensor grounds will be attached at another location.
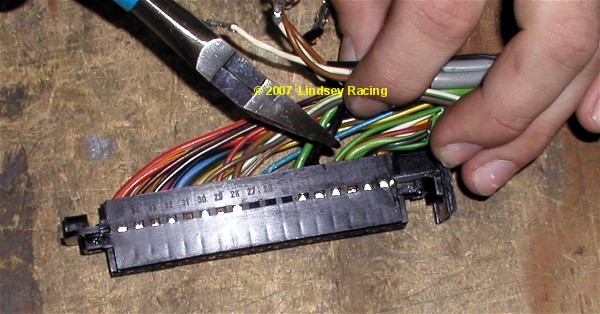


Step #10 "Finishing Up the Connections"


There are a few things going on here.

The new Reference Sensor Harness wires were fished through the rubber grommet. We spread the grommet with a pair of needle nose pliers making a passage way to slip the wires through.

The old reference sensor wires were clipped off a few inches from the plug. There isn't room for the old and new in the plug so they must go.

The brown ground wire we clipped in step #8 has been stripped bare on the end preparing it for soldering.
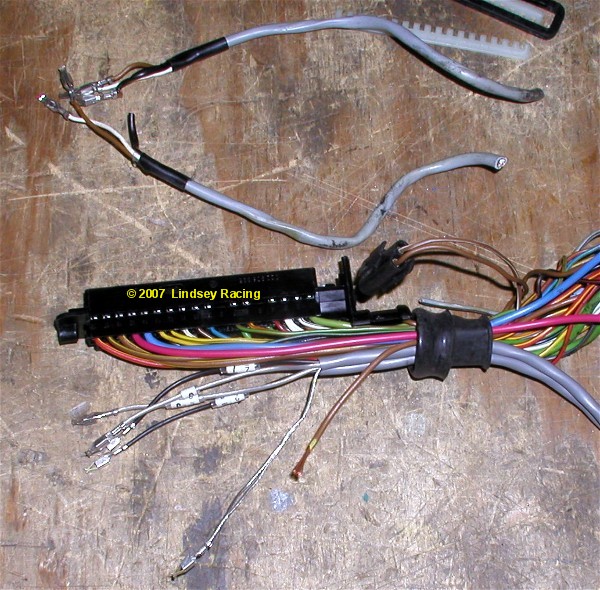


Step #11 "Solder Ground to Grounds."


We need to attach the brown ground wire to the bare ground wires on the new harness. Here you see the solder connection done. It is not necessary to tape this connection.

Insert the new terminals into their assigned slots. The wires on the new harness are tagged with the assigned DME pin numbers.
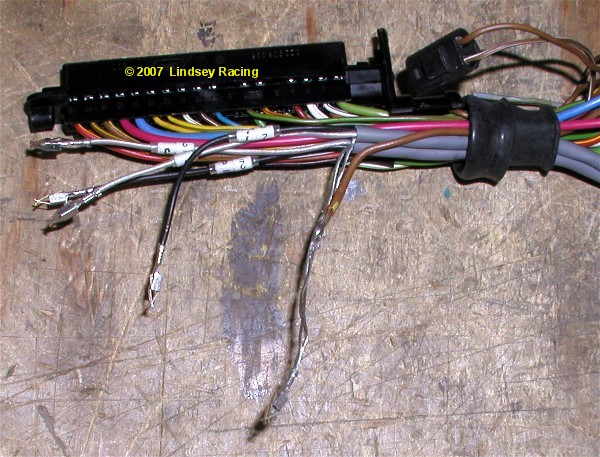


Step #9 "Close Connector Up"


Re-install the Pin Retaining Rail you removed in step 6. Slide the DME connector cover back into place. Re-install the small end screw. Slide or roll the rubber boot back into place.

The DME Connector is now complete.
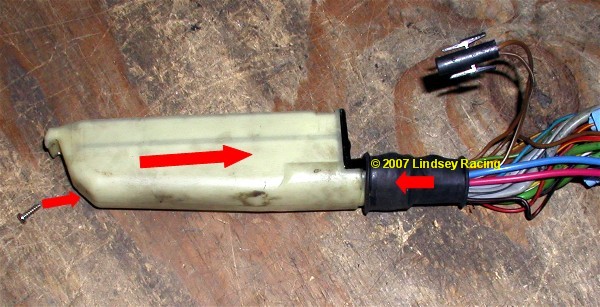


Top

INTERNATIONAL ORDERING


TO OUR INTERNATIONAL CUSTOMERS:


In the past, we have used a separate order form for placing International orders. We have quit using that process and are requiring all customer to use the shopping cart system built into the web site and it's check out process.

If you simply want a quotation and are not ready to place an order, then cut and paste the contents of your shopping basket, take a screen shot of the basket, or make a list of items and send us a email requesting a quotation with shipping.

If you need shipping prices before you make your final decision to purchase, then you should request that quotation by email and not use the shopping cart checkout process because you will be paying for the parts at that time.

Since our shopping cart and shipping estimator will "NOT" correctly calculate shipping charges on International Orders, we have it set-up to where the shipping will be Zero Dollars ($0.00) when checking out. When the shopping carts address process learns you are not in the United States by selecting your particular country, that's when it switches to equal Zero. That does NOT mean shipping is free.

Upon completion of the check out process, you will have paid for your parts but NOT the shipping on those parts.

Once we look over your parts ordered and calculate shipping weights and box sizes, we will send you an E-Mail with at least one shipping option and maybe several. We utilize UPS, DHL and the United States Postal Service (USPS) to deliver your parts.

Once you pick a shipping carrier and agree to the quotation by returning the E-Mail, we will be sending a PayPal money request for the amount of the shipping to be collected. If the parts are expected to be shipping out quickly, then you may receive that email quickly. If the parts are going to need to be built or something is on back order from the list of parts, we may hold off sending that E-Mail until we have the shipment ready to go. It can vary from order to order as to how we do that. If you think you should be hearing from us quickly, but you don't, feel free to contact us.

If you have special shipping needs or requirements, during the checkout you will see a SPECIAL ORDER INSTRUCTIONS window. Enter that special information there.

A good bit of our business is International and we have been taking care of those valued customers since 1999.

Top

TURO LEVANEN

'88 944 TURBO S 3 Liter Street Legal Track Racer!

This car is the only one driven both daily on the street and in the Nordic Porsche Sports Cup series.


Engine Mods Include:

3 Liter 968 block bored to 105 mm
LR 65 Turbocharger (LR)
3” to 5” exhaust (LR)
Stainless steel 3” downpipe (LR)
Sport headers (LR)
Catcam cam
Link engine management and all new electrical wiring
Old mechanical rotor ignition changed to coil pack / EMS / digital ignition with new TDC measuring
Flex fuel for 85 ethanol to 98 gas--all mixtures go
Head with 48 mm intake valves
Comet 3 layer head gasket (LR)
140# valve springs (LR)
5 angle seat grind
Larger Intercooler with aluminum hardpipes w/ silicone hoses
LR silicon water hoses
LR fuel rail with 92 lb injectors
Intake Manifold – extrude honed and polished
Racing fuel pump with new hoses
Tial 38mm wastegate
Solenoid over boost controller. Two programs (1.0-1.3 bar). 400 hp-500 hp
Wössler pistons (105 mm 8.5:1 compression) LR
Pauter con rods LR
Light battery in race mount and cut-off switch
Silicon vacuum lines LR
Rod bearings, main and balance shaft bearings Calico metal coated
Oil Pan and Balance Shafts Reseal
Recent radiator, water pump, rollers, belts etc. new – Gates Kevlar/Blue Timing belt
Approx. max horsepower 480 rwhp with 720 Nm torque (531 ft/lb) with substantial dyno hours


Driveline/Transmission:

SPEC Stage 3 Clutch LR
Heavy duty motor mounts
Heavy duty trans. mounts
Recent Clutch Master/Slave with hoses
Heavy duty drive shafts LR
Torque tube with heavy duty bearings
Quaife mechanical differential
All wheel and drive shaft bearings new
All bushings non-OEM


Brakes:

GT3RS 997 brakes and 350 mm slotted and cross drilled rotors
Turbo s rear brakes
Brake bias valve changed


Suspension:

Koni Sport Front
Koni Series 30 racing rear
Front 500 lbs coil springs
Rear 900 lbs coil springs
Adjustable front camber plates
M035 sway bars LR
Elephant Racing Polybronze spring plate bushings
Poly bushings everywhere else
Front solid bushing ball joint kit
Strut tower bar
Lower caster block bar
New front and rear wheel bearings
Recent race alignment and corner balance


Body:

Front/Rear tow hooks
Fire extinguisher system in cabin and engine bay
Fender flares
GT3 front splitter
Rear diffuser in process
968 rear lights and bumper carbon fibre
Sunroof removed (GT parts)
997 gt2 rear wing
Glass fibre hood
Plastic rear window


Interior:

Sparco/GT3 Speed Seats (R & L) in black
Porsche GT3 Steering Wheel and hub
Sparco 6pt cam lock harnesses (R & L)
Geiko racing approved gauge
Stock seat belts remain functional
Track Mats, steel plates and Lightened pedals aluminum
Extra long shifter stick and short shifter
Electrical boost control 2 programs – center console
A/F meter-center console
Fuel pressure meter
Boost meter
Racing “kill” switch in cabin
Full fire ext. system cabin and engine bay with external switch
Back seat delete
Top

INTERNATIONAL ORDERING


TO OUR INTERNATIONAL CUSTOMERS:


In the past, we have used a separate order form for placing International orders. We have quit using that process and are requiring all customer to use the shopping cart system built into the web site and it's check out process.

If you simply want a quotation and are not ready to place an order, then cut and paste the contents of your shopping basket, take a screen shot of the basket, or make a list of items and send us a email requesting a quotation with shipping.

If you need shipping prices before you make your final decision to purchase, then you should request that quotation by email and not use the shopping cart checkout process because you will be paying for the parts at that time.

Since our shopping cart and shipping estimator will "NOT" correctly calculate shipping charges on International Orders, we have it set-up to where the shipping will be Zero Dollars ($0.00) when checking out. When the shopping carts address process learns you are not in the United States by selecting your particular country, that's when it switches to equal Zero. That does NOT mean shipping is free.

Upon completion of the check out process, you will have paid for your parts but NOT the shipping on those parts.

Once we look over your parts ordered and calculate shipping weights and box sizes, we will send you an E-Mail with at least one shipping option and maybe several. We utilize UPS, DHL and the United States Postal Service (USPS) to deliver your parts.

Once you pick a shipping carrier and agree to the quotation by returning the E-Mail, we will be sending a PayPal money request for the amount of the shipping to be collected. If the parts are expected to be shipping out quickly, then you may receive that email quickly. If the parts are going to need to be built or something is on back order from the list of parts, we may hold off sending that E-Mail until we have the shipment ready to go. It can vary from order to order as to how we do that. If you think you should be hearing from us quickly, but you don't, feel free to contact us.

If you have special shipping needs or requirements, during the checkout you will see a SPECIAL ORDER INSTRUCTIONS window. Enter that special information there.

A good bit of our business is International and we have been taking care of those valued customers since 1999.