Lindsey Racing is your 24/7/365 source for Front Engine 4 Cylinder Porsche Parts     Lindsey Racing is your 24/7/365 source for Front Engine 4 Cylinder Porsche Parts    
Filters

Secure Checkout
Your Shopping Cart Is Empty

Secure Checkout

Shop LINDSEY WASTEGATE

LINDSEY WASTEGATE INSTALLATION

QUICK INTRO


The following is our on-line tutorial on how to "do it yourself" install the Lindsey Racing 944 Turbo (951) wastegate.

Porsche used two different styles of wastegates on the 944 turbo. As far as we have been able to confirm, the '86 and '87 used one style and the '88 and newer used the other. The difference is in the hot housing's outer dimensions. The cooling fins on the '86/'87 are larger and the portion of the housing where some bolts pass through to attach to the mounting bracket is thicker. They are completely interchangeable but the bolt length issue will come up if you install one different than the one that came out of your car.

Our wastegate comes with both bolt lengths to allow you to use either wastegate style, so it's not a big issue.

Pictured are two different styles of the Lindsey Racing wastegate. The difference only being in the hot housing.


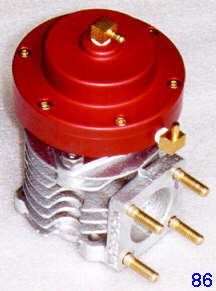
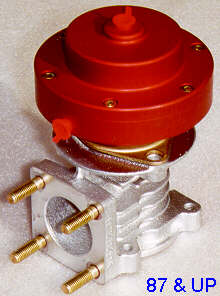
If you install an '88 and newer style where there was an '86/'87, you will discover the three Allen bolts that attach the bracket to the wastegate will be too long and hit the cooling fin on the new diaphragm housing. If you install an '86/'87 style where there was an '88 and newer, you will discover that the bolts are too short and will barely catch the threads. Use the appropriate supplied bolts.

We would like you to order the one that your car has now, but this is not required. You can confirm which one you have by using a flashlight and shining down at the back of the engine on the right side, up against the firewall, and inspecting the fin area. The differences are very obvious.

When using a dual port wastegate (such as this one) on the 944 turbo, and controlling it with either a single, 2 stage or electronic boost controller, you "do not" use the cyclic valve. Using the cyclic valve will result in un-controllable boost levels. This is, of course, not good. In the last step, we will show you how to deal with the old lines to the cyclic valve.

It may at this point look like it's a long process, but it's not. The following steps can be very short and most are. First timers can expect to take 1-2 hours.

When you get to the next frame, we recommend you read the whole step before you perform it.

The wastegate we are removing in this illustration is one of our prototype dual ports. It is the same as the stock piece other than the diaphragm housing. We are also removing a style '88 and installing a style '86/'87. The removal of the factory wastegate is identical. So pretend it is the original one. Don't let all this confuse you. We just wanted to let you know what things seem a little different than you will be encountering.

STEP 1


Raise the front of the car in the air and support with jack stands. Do not get underneath your car without jack stands or some other approved support.

Remove the 5 10mm bolts holding the aluminum shield behind the oil pan. This exposes the wastegate completely.

STEP 2


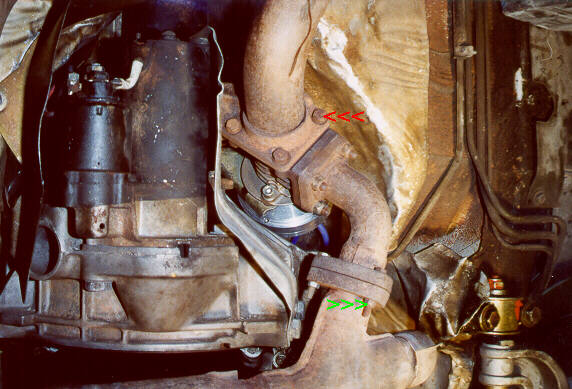
Remove the 4 13mm bolts attaching the wastegate to the outlet pipe. (RED)

Remove the 3 10mm bolts attaching the wastegate to the crossover pipe. (GREEN)

STEP 3


Remove the 2 13mm bolts attaching the wastegate mounting bracket to the drive shaft tube mount. These are located way up top about 4 inches above the wastegate and face backward. (RED)

We remove the bracket from the wastegate once it is out. The bolts are too difficult to access in the car.


What works best for this is a long extension, or couple several together to equal about 18 inches. You will need a swivel socket. The chrome works better than the impact type. A 1/2" will work if you don't have a metric one.

Loosen the clamp on the hose at the top of the diaphragm housing. Slip the hose off the fitting.

Now it is time to remove the wastegate.

You may need to tap on the wastegate lightly on the side port flange to jar it loose from the exhaust outlet pipe.

Rotate as necessary and lower down from the car.

STEP 4


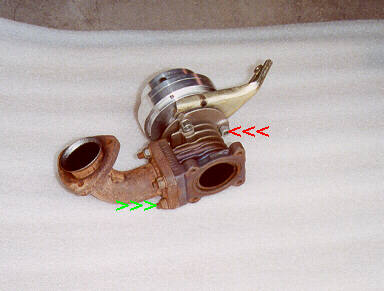
This is the old wastegate after removal.

There is a doughnut style gasket on the inlet pipe which would be left on the car. There is a metal crush ring gasket on the wastegate outlet pipe. Our experience so far, even after changing the wastegate on this car many times, is that the gaskets are re-usable. For the price of the new ones, you may want to replace them for assurance that there are no exhaust leaks.

Remove the 3 6mm allen bolts holding the wastegate to the mounting bracket (RED) and install the same parts and bolts on the new wastegate.

Remove the exhaust inlet pipe by removing the 4 13mm nuts with washers. (GREEN) A little WD-40 works well here. If the stud comes out with the nut, remove the nut from the stud because we will be re-using the nuts. The new wastegate has studs already.


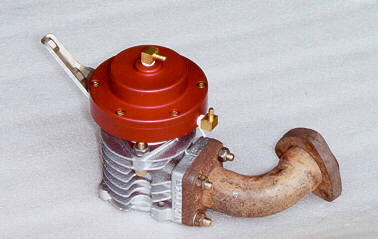
Here we see the new wastegate with the mounting bracket and inlet pipe installed. We also install the hose barb fittings on the pressure and control port. Use Teflon tape on the threads.

Note the proper orientation of the inlet pipe to the wastegate. It only works one of the four possible ways you could install it.

STEP 5


Raise the wastegate back up into position. Rotate as necessary to get into place.

Replace the 4 bolts connecting the wastegate to the outlet pipe first. (RED)

Replace the 2 13mm bolts holding the wastegate mounting bracket to the driveshaft tube bracket. (out of sight)

Replace the 3 10mm bolts holding the wastegate inlet pipe to the crossover pipe. (GREEN)

We assume at this point you have the boost controller installed and are ready to connect the two lines.

Connect the boost pressures line (from the banjo bolt) to the top port on the wastegate. (YELLOW)

Connect the control line from the regulator to the side port on the wastegate. (BLUE)

STEP 6


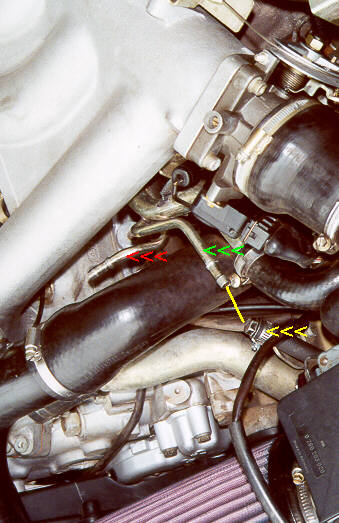
Installing a dual port wastegate and boost controller eliminates the use for the cyclic valve which is located under the intake manifold at the back.

We need to address the old lines attaching it.

The metal line coming out from under the front of the intake manifold that used to be attached to the banjo bolt can be left alone and un-plugged. (RED) The line from the cycling valve to the old wastegate can be left alone.

The rubber hose that used to connect to the second metal line (YELLOW) coming out from under the intake manifold (GREEN) needs to be plugged. Otherwise we have an intake air leak. You can leave the metal line open.


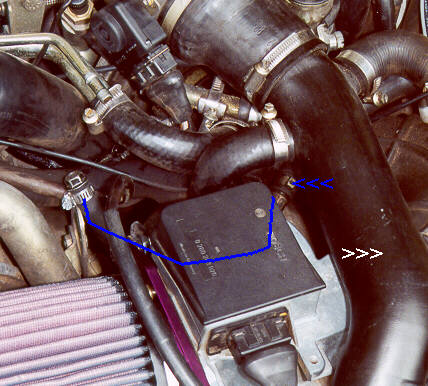
Another option for this hose is to remove it and plug at the intake boot by cutting the clamp and pulling it out. (BLUE) You can slide a bolt or some other similar plug into the hole and install a hose clamp to secure it. You will need to remove the intercooler pipe (WHITE) to access it.

This completes the installation of the wastegate.

Top

INTERNATIONAL ORDERING


TO OUR INTERNATIONAL CUSTOMERS:


In the past, we have used a separate order form for placing International orders. We have quit using that process and are requiring all customer to use the shopping cart system built into the web site and it's check out process.

If you simply want a quotation and are not ready to place an order, then cut and paste the contents of your shopping basket, take a screen shot of the basket, or make a list of items and send us a email requesting a quotation with shipping.

If you need shipping prices before you make your final decision to purchase, then you should request that quotation by email and not use the shopping cart checkout process because you will be paying for the parts at that time.

Since our shopping cart and shipping estimator will "NOT" correctly calculate shipping charges on International Orders, we have it set-up to where the shipping will be Zero Dollars ($0.00) when checking out. When the shopping carts address process learns you are not in the United States by selecting your particular country, that's when it switches to equal Zero. That does NOT mean shipping is free.

Upon completion of the check out process, you will have paid for your parts but NOT the shipping on those parts.

Once we look over your parts ordered and calculate shipping weights and box sizes, we will send you an E-Mail with at least one shipping option and maybe several. We utilize UPS, DHL and the United States Postal Service (USPS) to deliver your parts.

Once you pick a shipping carrier and agree to the quotation by returning the E-Mail, we will be sending a PayPal money request for the amount of the shipping to be collected. If the parts are expected to be shipping out quickly, then you may receive that email quickly. If the parts are going to need to be built or something is on back order from the list of parts, we may hold off sending that E-Mail until we have the shipment ready to go. It can vary from order to order as to how we do that. If you think you should be hearing from us quickly, but you don't, feel free to contact us.

If you have special shipping needs or requirements, during the checkout you will see a SPECIAL ORDER INSTRUCTIONS window. Enter that special information there.

A good bit of our business is International and we have been taking care of those valued customers since 1999.

Top

TURO LEVANEN

'88 944 TURBO S 3 Liter Street Legal Track Racer!

This car is the only one driven both daily on the street and in the Nordic Porsche Sports Cup series.


Engine Mods Include:

3 Liter 968 block bored to 105 mm
LR 65 Turbocharger (LR)
3” to 5” exhaust (LR)
Stainless steel 3” downpipe (LR)
Sport headers (LR)
Catcam cam
Link engine management and all new electrical wiring
Old mechanical rotor ignition changed to coil pack / EMS / digital ignition with new TDC measuring
Flex fuel for 85 ethanol to 98 gas--all mixtures go
Head with 48 mm intake valves
Comet 3 layer head gasket (LR)
140# valve springs (LR)
5 angle seat grind
Larger Intercooler with aluminum hardpipes w/ silicone hoses
LR silicon water hoses
LR fuel rail with 92 lb injectors
Intake Manifold – extrude honed and polished
Racing fuel pump with new hoses
Tial 38mm wastegate
Solenoid over boost controller. Two programs (1.0-1.3 bar). 400 hp-500 hp
Wössler pistons (105 mm 8.5:1 compression) LR
Pauter con rods LR
Light battery in race mount and cut-off switch
Silicon vacuum lines LR
Rod bearings, main and balance shaft bearings Calico metal coated
Oil Pan and Balance Shafts Reseal
Recent radiator, water pump, rollers, belts etc. new – Gates Kevlar/Blue Timing belt
Approx. max horsepower 480 rwhp with 720 Nm torque (531 ft/lb) with substantial dyno hours


Driveline/Transmission:

SPEC Stage 3 Clutch LR
Heavy duty motor mounts
Heavy duty trans. mounts
Recent Clutch Master/Slave with hoses
Heavy duty drive shafts LR
Torque tube with heavy duty bearings
Quaife mechanical differential
All wheel and drive shaft bearings new
All bushings non-OEM


Brakes:

GT3RS 997 brakes and 350 mm slotted and cross drilled rotors
Turbo s rear brakes
Brake bias valve changed


Suspension:

Koni Sport Front
Koni Series 30 racing rear
Front 500 lbs coil springs
Rear 900 lbs coil springs
Adjustable front camber plates
M035 sway bars LR
Elephant Racing Polybronze spring plate bushings
Poly bushings everywhere else
Front solid bushing ball joint kit
Strut tower bar
Lower caster block bar
New front and rear wheel bearings
Recent race alignment and corner balance


Body:

Front/Rear tow hooks
Fire extinguisher system in cabin and engine bay
Fender flares
GT3 front splitter
Rear diffuser in process
968 rear lights and bumper carbon fibre
Sunroof removed (GT parts)
997 gt2 rear wing
Glass fibre hood
Plastic rear window


Interior:

Sparco/GT3 Speed Seats (R & L) in black
Porsche GT3 Steering Wheel and hub
Sparco 6pt cam lock harnesses (R & L)
Geiko racing approved gauge
Stock seat belts remain functional
Track Mats, steel plates and Lightened pedals aluminum
Extra long shifter stick and short shifter
Electrical boost control 2 programs – center console
A/F meter-center console
Fuel pressure meter
Boost meter
Racing “kill” switch in cabin
Full fire ext. system cabin and engine bay with external switch
Back seat delete
Top

INTERNATIONAL ORDERING


TO OUR INTERNATIONAL CUSTOMERS:


In the past, we have used a separate order form for placing International orders. We have quit using that process and are requiring all customer to use the shopping cart system built into the web site and it's check out process.

If you simply want a quotation and are not ready to place an order, then cut and paste the contents of your shopping basket, take a screen shot of the basket, or make a list of items and send us a email requesting a quotation with shipping.

If you need shipping prices before you make your final decision to purchase, then you should request that quotation by email and not use the shopping cart checkout process because you will be paying for the parts at that time.

Since our shopping cart and shipping estimator will "NOT" correctly calculate shipping charges on International Orders, we have it set-up to where the shipping will be Zero Dollars ($0.00) when checking out. When the shopping carts address process learns you are not in the United States by selecting your particular country, that's when it switches to equal Zero. That does NOT mean shipping is free.

Upon completion of the check out process, you will have paid for your parts but NOT the shipping on those parts.

Once we look over your parts ordered and calculate shipping weights and box sizes, we will send you an E-Mail with at least one shipping option and maybe several. We utilize UPS, DHL and the United States Postal Service (USPS) to deliver your parts.

Once you pick a shipping carrier and agree to the quotation by returning the E-Mail, we will be sending a PayPal money request for the amount of the shipping to be collected. If the parts are expected to be shipping out quickly, then you may receive that email quickly. If the parts are going to need to be built or something is on back order from the list of parts, we may hold off sending that E-Mail until we have the shipment ready to go. It can vary from order to order as to how we do that. If you think you should be hearing from us quickly, but you don't, feel free to contact us.

If you have special shipping needs or requirements, during the checkout you will see a SPECIAL ORDER INSTRUCTIONS window. Enter that special information there.

A good bit of our business is International and we have been taking care of those valued customers since 1999.