QUAD-M MAF SUPPORTSoftware Installation InstructionsFor trouble-free DBX software installation to your PC Click Here Software ProgramThis file is in .zip format and will require un-zipping before use. Full software (8.48MB) available for download Click Here To use this software with your DBX mass air meter, you will need to purchase a USB 2.0 A to mini 5-pin connector. Meter Wiring DiagramThe diagrams are in ".pdf" format. QUAD-M MAF Meter Wiring 944 Turbo (951) .DBX Files ( The quick and simple way to get started )You can load the files with the USB cable without supplying 12 volts to the meter. Other words, you can load the files at the comfort of your desk, then go install the meter in your car. These files consist of a "Project" with one or more .maf files already loaded. (S*) indicates the switch position on the DBX85 MAF Meter head to get that particular calibration. File #1 ----- 19#(S1) | 24#(S2) | 30#(S3) | 36#(S4) ~ MAF CALIBRATIONS 19243036.DBX File #2 ----- 19#(S1) | 24#(S2) | 30#(S3) | 36#(S4) | 951 AFM (S5) ~ 951 AFM / MAF CALIBRATIONS 19243036AFM951.DBX File #3 ---- 951 AFM(S1) | 30#(S2) | 33#(S5) | 36#(S8) ~ 951 AFM / MAF CALIBRATIONS AFM95130TO36.DBX File #4 ----- 944 AFM(S1) | 19#(S2) | 911/993(S3) ~ 944 8v AFM / MAF CALIBRATIONS / 911/993 AFM 944AFM19.DBX File #5 ----- 951 AFM(S5) 951AFM5LR.DBX File #6 ----- 951 AFM(S6) 300RWHP6LR.DBX Consult Lindsey Racing for the particular calibration you should be using for your modifications. Refer to the illustrations below for loading a .dbx file. Select the appropriate MAF calibration you wish to use with the rotary switch on the DBX85 Meter Head. WarrantyThe DBX Meter has a 1 Year (365 Days) warranty from the original date of purchase. If you think you have a meter issue beyond that time frame, contact ABACO Performance, LLC directly to see if they can offer any assistance. PLEASE READ!!! HOW TO & MISC INFORMATION TO KNOWThese tips will help you and keep you moving ahead without additional support. It's important the meter is positioned to flow air though it in the proper direction. The 4 hot wire sensors at the front of the boards should be the inlet side. The white 6 plug connector offset from center is the inlet side of the meter. Once you make any voltage changes or adjustments in the software program to your DBX MAF meter, such as moving the slider bars to richen or lean the mixture, you will need to select the "Write DBX" button to load the changes into the DBX85. You can load the individual table you changed, or if you check the "Show All Outputs" window, then "Write DBX", it will load all 10 tables back to back. Once you load the table(s), you must cycle the meter in order for the changes to take effect. By that we mean you must kill the power to the meter. Turn the key off if the meter is powered by a switched 12v power source, or un-plug the meter. If you still have your USB cable connected to the DBX85, you need to un-plug it as well since the USB is powering the meter. So Kill All Power! So unlike our Mafterburner piggy back fuel controller where you live tune and the changes are immediate, you must "Write DBX" tables and cycle the DBX85 for any changes to take effect. When changing positions on the rotary switch on the DBX85 to switch tables, you must again cycle the meter for the change to take effect. If you change positions on the switch while the car is running, the change will not take effect until you turn off and re-start the car. You can load maps, adjust tables and setting etc... within the MAF by just the use of the USB cable without supplying 12v power to the meter. The USB powers the meter for that purpose but will not supply output 1-5v signal to run the car. Air Temp should be set to "Other Sensors" for 944 / 944T. This is already done in our downloadable.dbx files above. This replicates the factory 3.2K at 60F/25C temp sensor in the Air Flow Meter. The "Ford" setting gives you a 33K at 60F/25C output. Loading a .DBX file to your meterStep #1 "Connect Meter"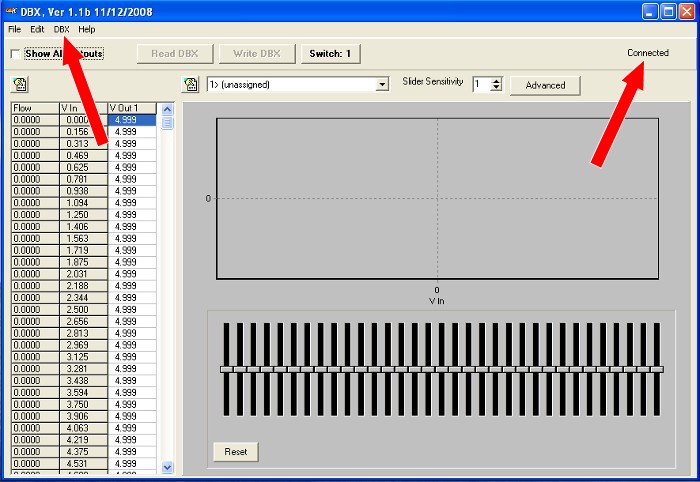 Once you have the software properly installed (should not be a problem if you followed the instructions), connect your DBX MAF Meter to your computer using the USB 2.0 to 5 pin mini cable. Start the DBX program and your screen should look like above. It should say "connected" in the upper right. If it does not, and you get a connection error message such as [specified device not found], then pull down from the top program menu DBX / OPTIONS then select a different COM port. You will be required to close and re-open the program. Step #2 "Select and Load .DBX File"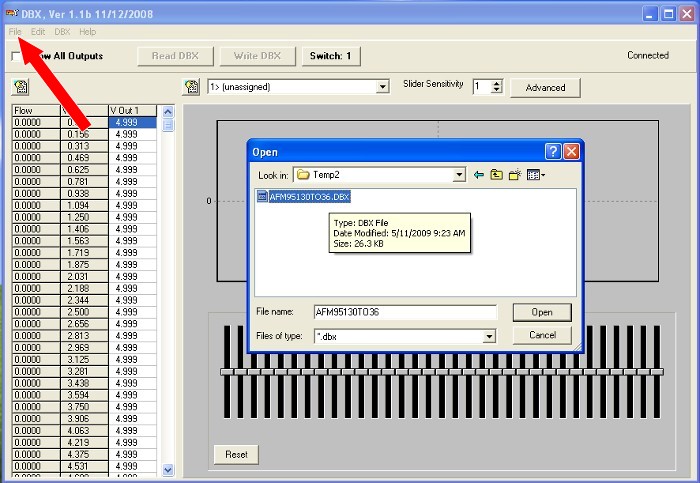 Once you downloaded a .dbx file to your computer you would like to use, from the top program menu, pull down FILE / OPEN and browse to the .dbx file you downloaded. In this example, we placed it in a directory named Temp2. Select and OPEN that file or double click on it as is you were opening a typical computer file to open. Step #3 "View File"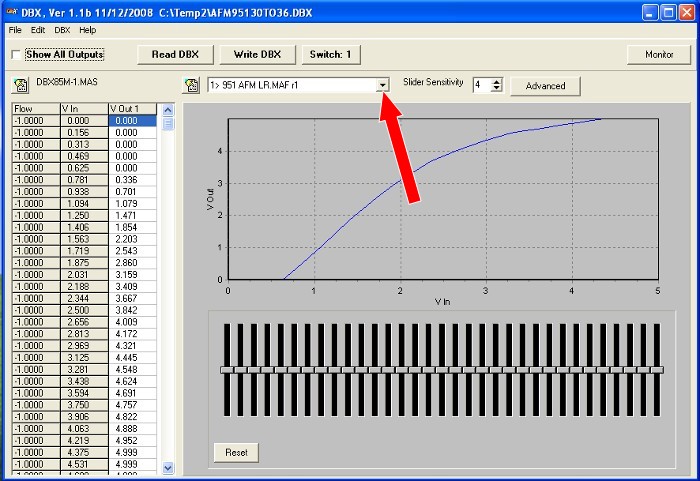 If all is well so far, then your screen should look like above. You can use the drop down and scroll through the different maps and look at the curves if you want. This one is looking at 1>... Step #4 "Upload files to Meter"< 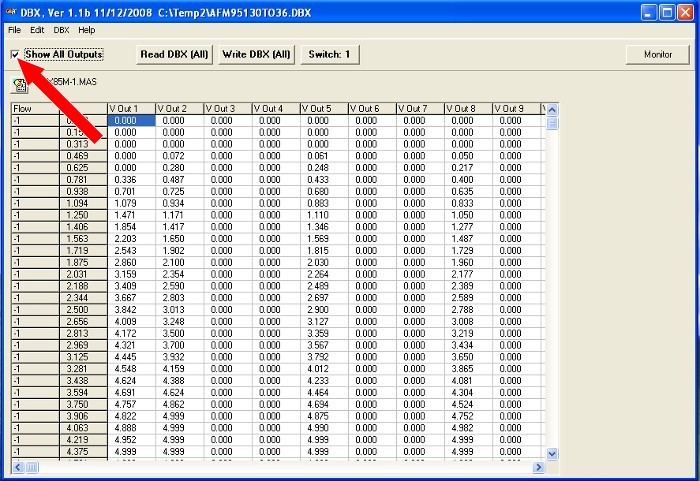 Click in the "Show All Outputs" window. This will then display all 10 maps in a numeric value looking format. By doing this, we can upload all 10 maps to the DBX meter at once. If you had worked just one of the files, you could choose to NOT select the "Show All Outputs" window, then just write 1 of the 10 files to the meter at a time. Step #5 "Transfer .dbx file to DBX Meter"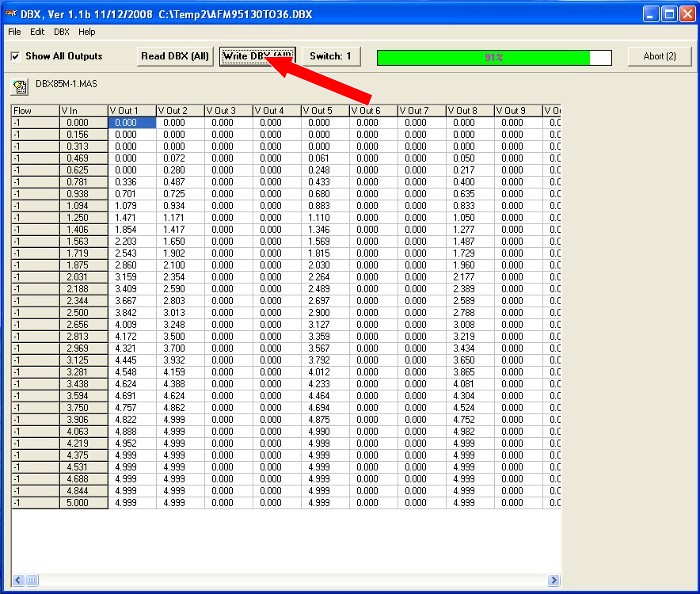 Next step is to depress the "Write DBX [All]" button. After you do this, you will witness the loading of all 10 files and the progress bar as they load displays the amount completed. Once all 10 files are loaded, the screen returns to how it looked before you depressed the button. At this time, you MUST un-plug the meter from the power source, (could mean turn off the key in the car) AND un-plug the USB cable from the DBX Meter. All power, including that supplied through the USB must be terminated. It is not necessary to supply the meter 12v as the USB is all that is required, but if you have it wired in the car, and don't turn it off, then your changes will not take effect. This is necessary to cycle the meter and complete the loading of the files. Next time you give it power, the changes will be active. Changing values in a .dbx fileStep #1 "Locating voltage controls and function"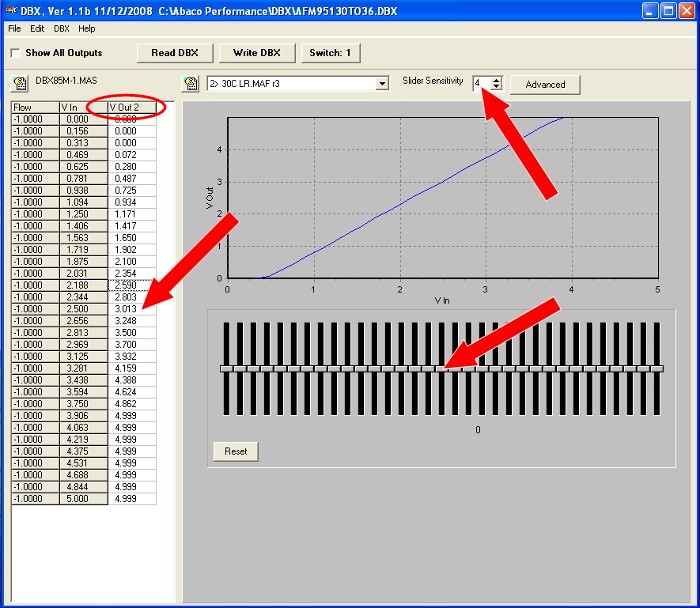 At this time, we are going to modify a file to add and/or remove fuel by changing the Voltage out (V Out 1) values. Increasing the voltage will add fuel or enrich-en the fuel mixture, and by decreasing the voltage, will remove or lean the fuel mixture. You can do this by either adjusting the (V Out 1) values in their cells, or adjust the slider bars. If adjusting the slider bars, you can also first adjust the sensitivity of the adjustment versus movement of the slider by changing this value in the "Slide Sensitivity" window. Here it shows a value of 4. Step #2-1 "Adjusting output with slider bars"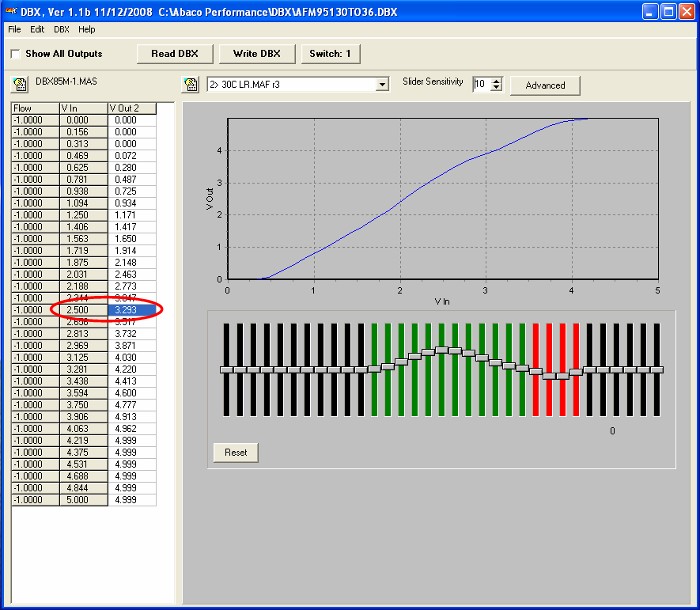 Lets assume the fuel mixture was lean in the middle or mid range going into boost, and a little rich in the upper end of the RPM range. In this example we have adjusted the slider bars to add fuel by increasing the output voltage in the middle, which shows up in green, and decreased it at the top shown in red. We made a .5 volt output increase in the 2.5 V In cell first. Then we blended the cells on either side to make the curve gradual and smooth. Then we decreased the voltage slightly from the .3.594 V In cell and those next 3 to the right. Once your adjustments have been made, select the "Write DBX" button and it will prompt you to OK the writing of table 2 (the one we just modified). Select "YES" and it will upload the file to the DBX Meter and you can monitor the progress bar to know when it's completed. Cycle the power to the meter and your changes are completed. Step #2-2 "Adjusting output in [V Out] cells"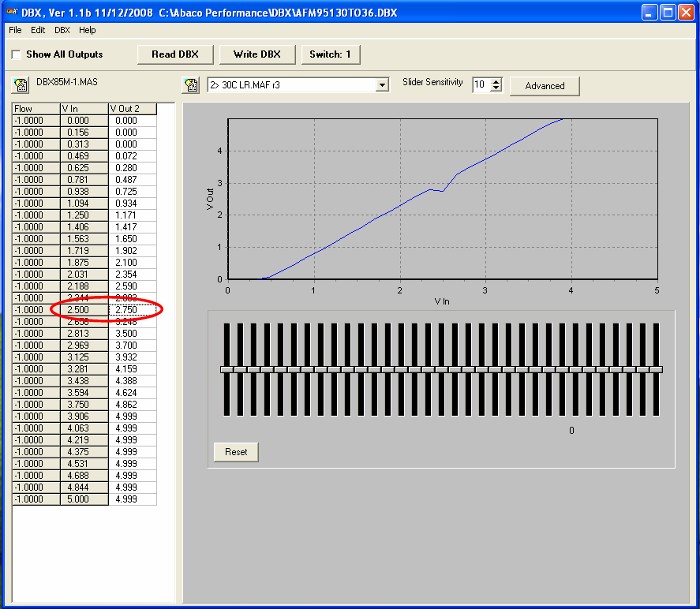 In this example, lets assume the fuel mixture was rich in the middle or mid range going into boost, and a little lean in the upper end of the RPM range. Only we are going to make changes in the V Out cells rather then use the slider bars. It has the same effect, but you do have more and range as you can enter any value you want rather then the range of the slider, even set at a sensitivity of 10. The slider bars will not move when you make cell changes. We are starting by changing the "V out" voltage from 3.013 to 2.75 in the 2.5 "V In" cell. You can see the voltage change illustrated in the fuel graph by the spike. 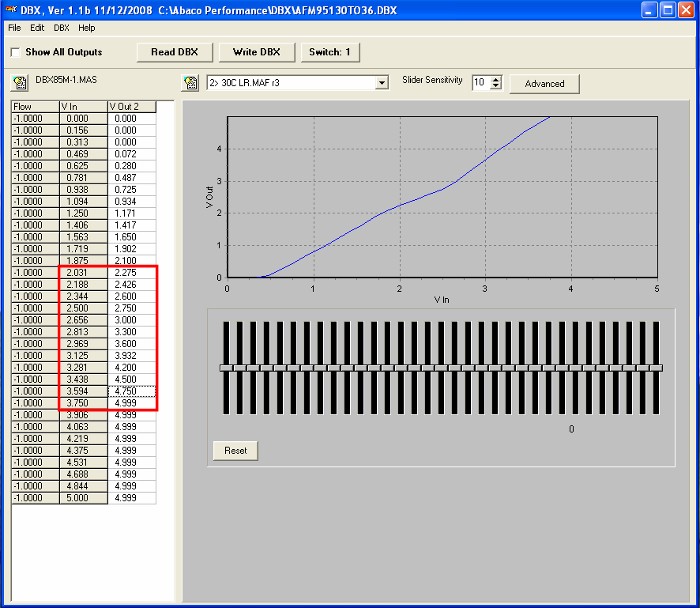 Then we did the same type of blending or smoothing of the curve, but did it by changing the values in the cells above and below the 2.5 "V In" cell. Then we richened the top end of the fuel graph by increasing the "V Out" in the 3.281 to 3.750 "V In" cells. Once your adjustments have been made, select the "Write DBX" button and it will prompt you to OK the writing of table 2 (the one we just modified). Select "YES" and it will upload the file to the DBX Meter and you can monitor the progress bar to know when it's completed. Cycle the power to the meter and your changes are completed. |
Secure Checkout