Lindsey Racing is your 24/7/365 source for Front Engine 4 Cylinder Porsche Parts     Lindsey Racing is your 24/7/365 source for Front Engine 4 Cylinder Porsche Parts    
Filters

Secure Checkout
Your Shopping Cart Is Empty

Secure Checkout

Shop ST 1&2 INTERCOOLER

LINDSEY INTERCOOLER INSTALLATION

QUICK INTRO


The following is our tutorial on how to "do it yourself" change your intercooler on the Porsche 944 Turbo. It may at this point look like it's a long process, but it's not. The following steps can be very short and most are. First timers can expect to take 1-2 hours. Once you do it once or twice, you can get it done in under 30 minutes.

Tools Required or Suggested:

Straight blade screwdriver
#2 Phillips screwdriver
1/4 drive ratchet
3" extension
8"+ extension
10mm socket
8mm socket
Hack Saw or Electric Drill with 1/8", 3/16" and 3/8" bits

I recommend you read the whole step before you perform it.

STEP 1


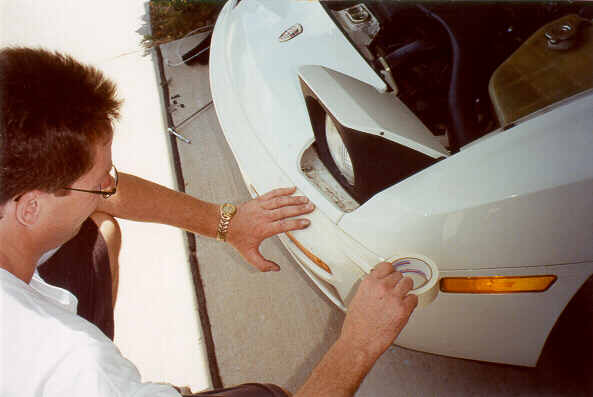
We suggest you put some masking or similar tape on the bumper to protect the finish from scratches when you slide the header panel forward. Put the tape right up tight against the header panel.

STEP 2


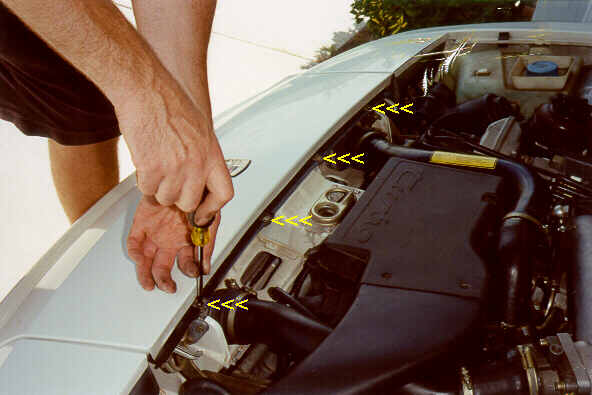
Remove the four #2 Phillips screws across the back of the header panel.

STEP 3


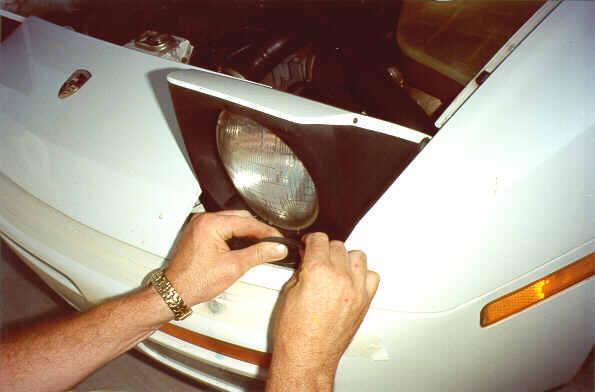
Raise the headlights to access the screws and parts under them. Grab the rubber pieces in front of the headlights and push back and up. We suggest you mark them or temporarily place them somewhere so you can put them back in the correct place later. This will save you from scratching your head later. There is a right and a left piece and they only go in one way.

STEP 4


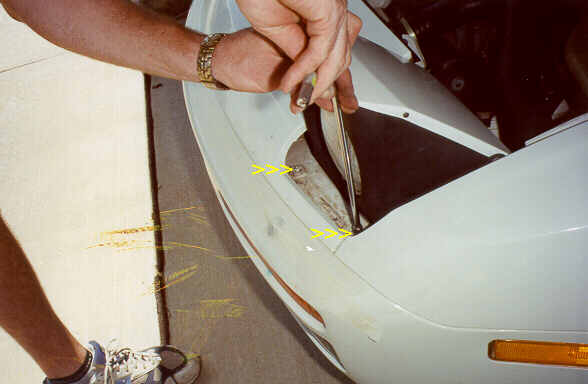
Remove the four 8mm hex nuts and washers. Two on the left side and two on the right side. You could only loosen them but it makes things a little trickier putting it back together since the washers keep getting in the way. Your choice!

STEP 5


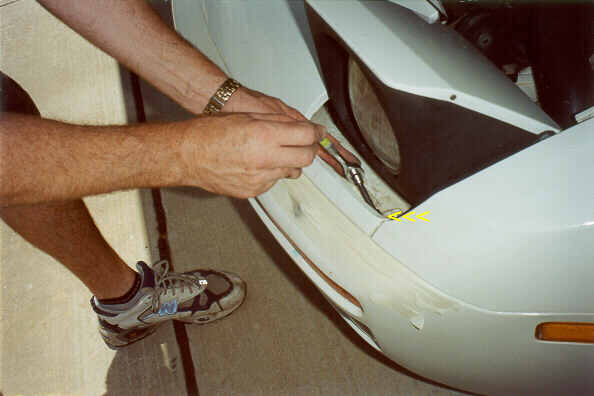
Remove the two 10mm hex head bolts. One on the left side and one on the right. A 1/4 drive ratchet and a 3" extension work best. Be careful not to swing the ratchet into the paint. Maybe a little tape on the header panel to protect it may be in order.

STEP 6


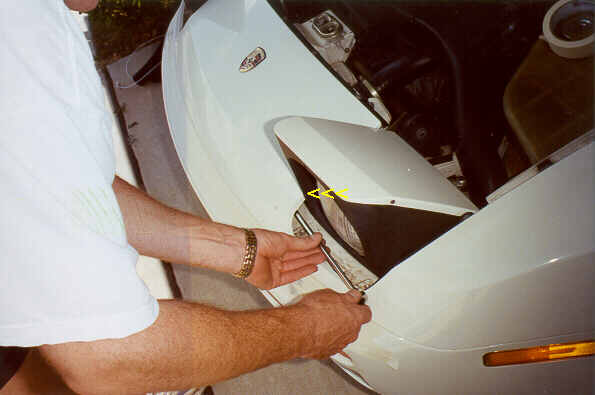
Remove the two bolts. We have seen either Phillips screws or hex head screws here. One on the left side and one on the right.

STEP 7


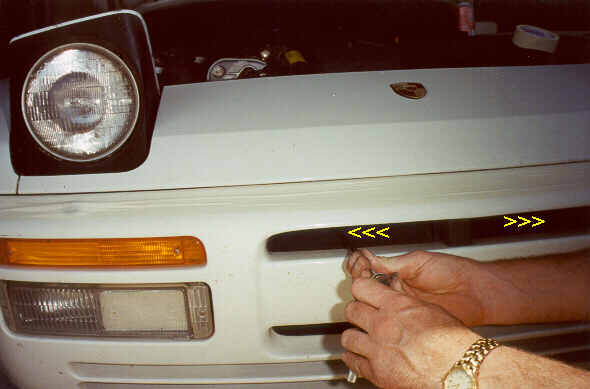
Remove the two 10mm plastic nuts. One right and one left of center. This can be done either now or once the header panel is removed.

STEP 8


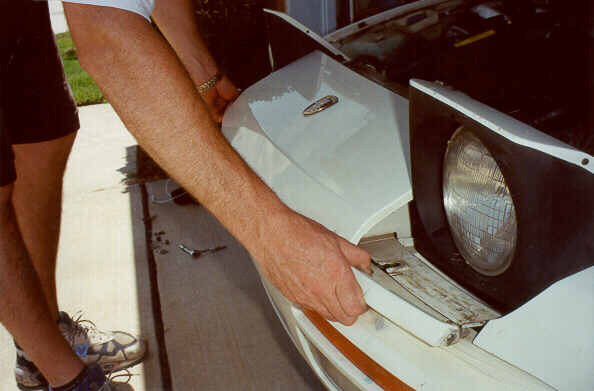
Carefully and slowly slide the header panel forward. You may need to push down slightly on either end to get it loose. Be careful not to scratch the header or the bumper during this step. A second pair of hands is helpful but not necessary.

STEP 9


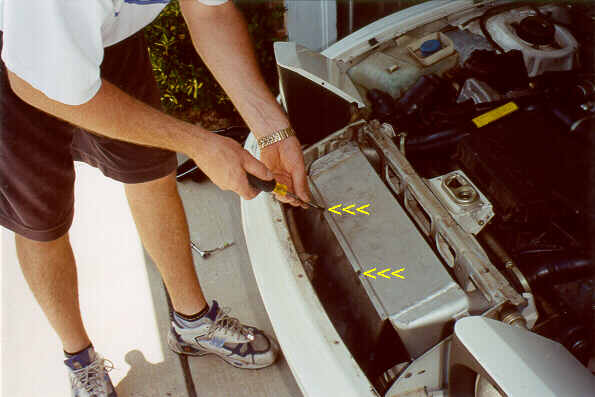
Remove the two #2 Phillips screws that attach the plastic ducting to the intercooler.

STEP 10


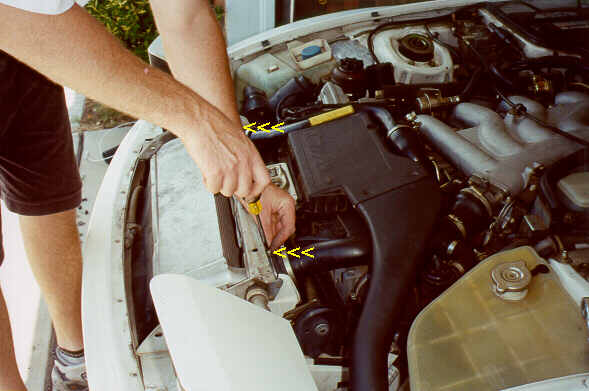
Loosen the two hose clamps that secure the rubber couplers to the intercooler. One on the left(inlet) and the right(outlet). These should be very loose to allow the intercooler to be tipped up. What works well is to loosen them enough that you can slide them over the other clamps. This keeps them out of the way when you re-assemble and insures that you don't forget or drop them.

STEP 11


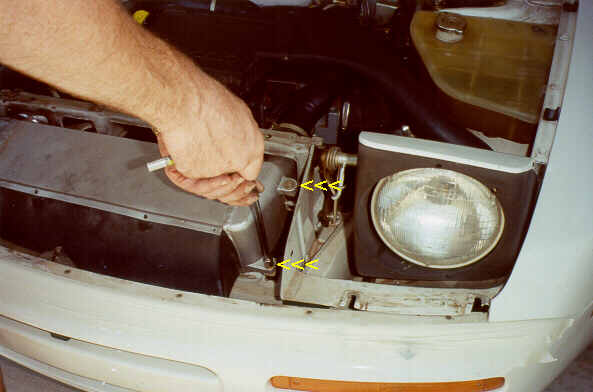
Remove the four 10mm hex bolts with washers that secure down the intercooler. Two on the left side and two on the right side.

STEP 12


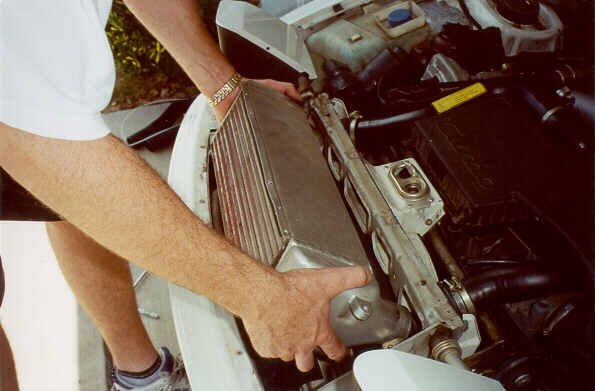
Firmly grab the intercooler and pull forward while you rotate it upward at the same time. You may need to pull the front plastic ducting forward out of the way during this process. It tends to get hung up on the front of the intercooler. No big deal though. Wiggling works well here.

STEP 13


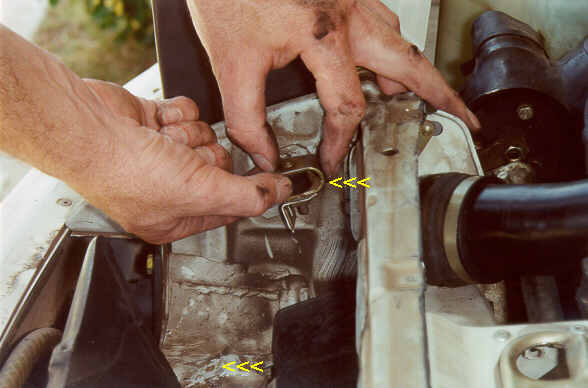
Remove the two intercooler mounts on the right (passenger) side. The rubber cushions have a threaded stud out the back. You may have to lightly squeeze the rubber with pliers and turn like a bolt to get them loose. We will be only using one of these during the re-assembly. This is a good time to inspect the two on the left side. If one is broken, then replace with one from the right side.

In this photo, the front one is already removed.

STEP 14


We must now remove the rear bracket close to the adjoining panel to allow clearance for the enlarged intercooler. We suggest two ways you can do this. One is to cut it off with a hack saw. This would be the quick way if you have a hack saw.


Second, is to drill the 4 spot welds that attach the bracket. Try to drill in the very center of the welds. Use a small pilot drill bit such as a 1/8", then move to a larger 3/16" bit. Save the bracket just in case you should ever want to reinstall the stock intercooler later by attaching the bracket with 3/16 pop rivets.


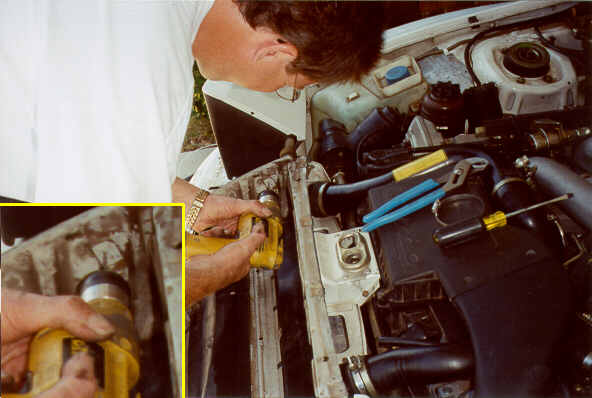
Here we are using a chisel and hammer to separate the two parts. Sometimes the welds need a little persuasion. Tap slowly and lightly. A thin screwdriver will also work.


STEP 15


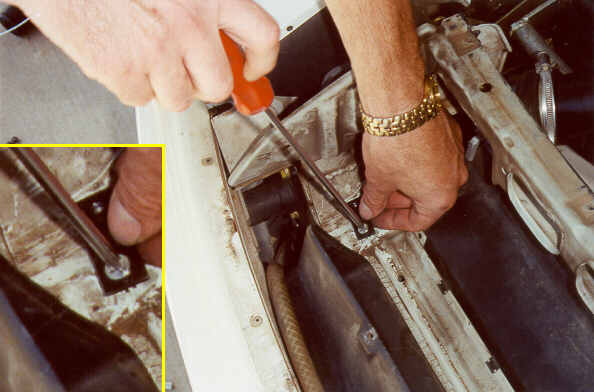
Install the supplied bracket on the right forward mounting hole. This bracket has a new threaded hole in it which moves the mounting out about 1-1/2 inches to the right. Place the star washer between the bracket and the frame and attach with the supplied tapered head Phillips screw.

Position the bracket facing the right and temporarily tighten. It's alignment is fairly important so do your best to get it aligned. Remember, it faces directly to the right side.

We will be re-using one of the rubber mounts and "c" shaped cage. We need to do one of two things here. (1) we need to shorten the stud protruding from the rubber mount by cutting it off with a hack saw. Remove about 50% of it. Or (2) our preferred method is to mark a spot in the sheet metal panel behind the bracket where the threaded hole is now located. Swing the bracket out of the way and drill a 3/8" hole which will allow clearance for the long stud to pass through. I recommend a nail (and a hammer of course) or thin center punch to mark the hole location.

Swing the bracket back to the right position and tighten securely.

Install the rubber mount with the "c" cage and tighten.

STEP 16


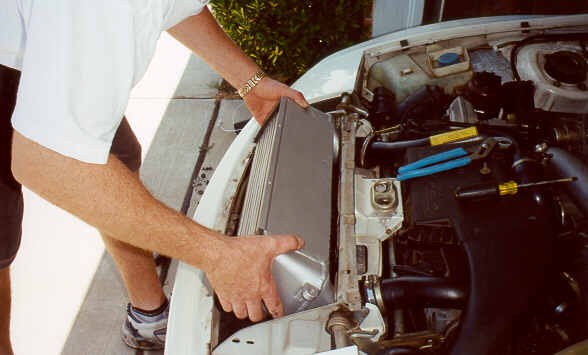
Position the new intercooler and rotate into place just like the way you removed the old one. Make sure the intercooler inlet and outlet are slipping into the rubber hoses. A little WD40 or similar lube makes it easier but is not necessary.

This may take some wiggling of things. You will have to slightly pull the front plastic ducting forward during the process because it will interfere with rotating the intercooler.

STEP 17


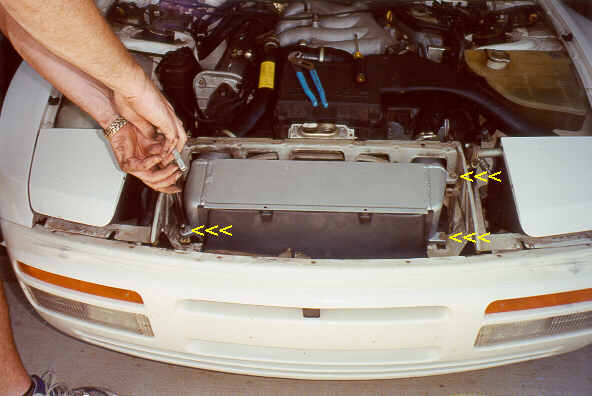
Re-install the three fasteners removed earlier. We will not be using the 4th which was on the right rear of the intercooler.

STEP 18


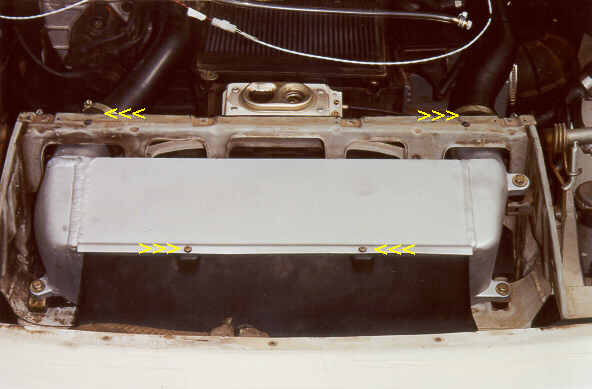
Re-install the two Philips screws connection to the front plastic ducting. Tighten the two hose clamps at the rubber intercooler connectors.

STEP 19


Congratulations !! You have installed your new Lindsey Racing intercooler. From here, you reinstall the header panel in the reverse order from when you took it off.

This should run smoothly, however we offer one tip. When you reinstall the rubbers beneath the headlights, it makes them easier to install if you spray them with WD-40 or soap them up to make them slippery before pushing them back into place.

Top

INTERNATIONAL ORDERING


TO OUR INTERNATIONAL CUSTOMERS:


In the past, we have used a separate order form for placing International orders. We have quit using that process and are requiring all customer to use the shopping cart system built into the web site and it's check out process.

If you simply want a quotation and are not ready to place an order, then cut and paste the contents of your shopping basket, take a screen shot of the basket, or make a list of items and send us a email requesting a quotation with shipping.

If you need shipping prices before you make your final decision to purchase, then you should request that quotation by email and not use the shopping cart checkout process because you will be paying for the parts at that time.

Since our shopping cart and shipping estimator will "NOT" correctly calculate shipping charges on International Orders, we have it set-up to where the shipping will be Zero Dollars ($0.00) when checking out. When the shopping carts address process learns you are not in the United States by selecting your particular country, that's when it switches to equal Zero. That does NOT mean shipping is free.

Upon completion of the check out process, you will have paid for your parts but NOT the shipping on those parts.

Once we look over your parts ordered and calculate shipping weights and box sizes, we will send you an E-Mail with at least one shipping option and maybe several. We utilize UPS, DHL and the United States Postal Service (USPS) to deliver your parts.

Once you pick a shipping carrier and agree to the quotation by returning the E-Mail, we will be sending a PayPal money request for the amount of the shipping to be collected. If the parts are expected to be shipping out quickly, then you may receive that email quickly. If the parts are going to need to be built or something is on back order from the list of parts, we may hold off sending that E-Mail until we have the shipment ready to go. It can vary from order to order as to how we do that. If you think you should be hearing from us quickly, but you don't, feel free to contact us.

If you have special shipping needs or requirements, during the checkout you will see a SPECIAL ORDER INSTRUCTIONS window. Enter that special information there.

A good bit of our business is International and we have been taking care of those valued customers since 1999.

Top

TURO LEVANEN

'88 944 TURBO S 3 Liter Street Legal Track Racer!

This car is the only one driven both daily on the street and in the Nordic Porsche Sports Cup series.


Engine Mods Include:

3 Liter 968 block bored to 105 mm
LR 65 Turbocharger (LR)
3” to 5” exhaust (LR)
Stainless steel 3” downpipe (LR)
Sport headers (LR)
Catcam cam
Link engine management and all new electrical wiring
Old mechanical rotor ignition changed to coil pack / EMS / digital ignition with new TDC measuring
Flex fuel for 85 ethanol to 98 gas--all mixtures go
Head with 48 mm intake valves
Comet 3 layer head gasket (LR)
140# valve springs (LR)
5 angle seat grind
Larger Intercooler with aluminum hardpipes w/ silicone hoses
LR silicon water hoses
LR fuel rail with 92 lb injectors
Intake Manifold – extrude honed and polished
Racing fuel pump with new hoses
Tial 38mm wastegate
Solenoid over boost controller. Two programs (1.0-1.3 bar). 400 hp-500 hp
Wössler pistons (105 mm 8.5:1 compression) LR
Pauter con rods LR
Light battery in race mount and cut-off switch
Silicon vacuum lines LR
Rod bearings, main and balance shaft bearings Calico metal coated
Oil Pan and Balance Shafts Reseal
Recent radiator, water pump, rollers, belts etc. new – Gates Kevlar/Blue Timing belt
Approx. max horsepower 480 rwhp with 720 Nm torque (531 ft/lb) with substantial dyno hours


Driveline/Transmission:

SPEC Stage 3 Clutch LR
Heavy duty motor mounts
Heavy duty trans. mounts
Recent Clutch Master/Slave with hoses
Heavy duty drive shafts LR
Torque tube with heavy duty bearings
Quaife mechanical differential
All wheel and drive shaft bearings new
All bushings non-OEM


Brakes:

GT3RS 997 brakes and 350 mm slotted and cross drilled rotors
Turbo s rear brakes
Brake bias valve changed


Suspension:

Koni Sport Front
Koni Series 30 racing rear
Front 500 lbs coil springs
Rear 900 lbs coil springs
Adjustable front camber plates
M035 sway bars LR
Elephant Racing Polybronze spring plate bushings
Poly bushings everywhere else
Front solid bushing ball joint kit
Strut tower bar
Lower caster block bar
New front and rear wheel bearings
Recent race alignment and corner balance


Body:

Front/Rear tow hooks
Fire extinguisher system in cabin and engine bay
Fender flares
GT3 front splitter
Rear diffuser in process
968 rear lights and bumper carbon fibre
Sunroof removed (GT parts)
997 gt2 rear wing
Glass fibre hood
Plastic rear window


Interior:

Sparco/GT3 Speed Seats (R & L) in black
Porsche GT3 Steering Wheel and hub
Sparco 6pt cam lock harnesses (R & L)
Geiko racing approved gauge
Stock seat belts remain functional
Track Mats, steel plates and Lightened pedals aluminum
Extra long shifter stick and short shifter
Electrical boost control 2 programs – center console
A/F meter-center console
Fuel pressure meter
Boost meter
Racing “kill” switch in cabin
Full fire ext. system cabin and engine bay with external switch
Back seat delete
Top

INTERNATIONAL ORDERING


TO OUR INTERNATIONAL CUSTOMERS:


In the past, we have used a separate order form for placing International orders. We have quit using that process and are requiring all customer to use the shopping cart system built into the web site and it's check out process.

If you simply want a quotation and are not ready to place an order, then cut and paste the contents of your shopping basket, take a screen shot of the basket, or make a list of items and send us a email requesting a quotation with shipping.

If you need shipping prices before you make your final decision to purchase, then you should request that quotation by email and not use the shopping cart checkout process because you will be paying for the parts at that time.

Since our shopping cart and shipping estimator will "NOT" correctly calculate shipping charges on International Orders, we have it set-up to where the shipping will be Zero Dollars ($0.00) when checking out. When the shopping carts address process learns you are not in the United States by selecting your particular country, that's when it switches to equal Zero. That does NOT mean shipping is free.

Upon completion of the check out process, you will have paid for your parts but NOT the shipping on those parts.

Once we look over your parts ordered and calculate shipping weights and box sizes, we will send you an E-Mail with at least one shipping option and maybe several. We utilize UPS, DHL and the United States Postal Service (USPS) to deliver your parts.

Once you pick a shipping carrier and agree to the quotation by returning the E-Mail, we will be sending a PayPal money request for the amount of the shipping to be collected. If the parts are expected to be shipping out quickly, then you may receive that email quickly. If the parts are going to need to be built or something is on back order from the list of parts, we may hold off sending that E-Mail until we have the shipment ready to go. It can vary from order to order as to how we do that. If you think you should be hearing from us quickly, but you don't, feel free to contact us.

If you have special shipping needs or requirements, during the checkout you will see a SPECIAL ORDER INSTRUCTIONS window. Enter that special information there.

A good bit of our business is International and we have been taking care of those valued customers since 1999.