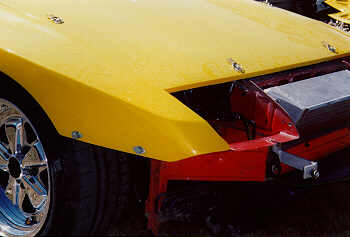
We later decided to run wider wheels and tires and purchased wide body quarter panels from GT Racing. We now needed to flare the front fenders to match the rear quarter panels. This was done by cutting slits in the fiberglass to allow it to conform to a shape similar to the rear quarters. The slits were then backed up with 2" masking tape and then filled with fiberglass resin and mat. After that hardened, the fenders were removed from the car and the slits were ground in the inside and the same filling process was repeated. Body filler was the final product used to smooth out the fender widening process.

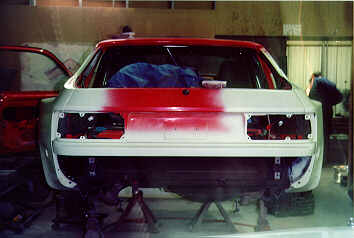
We had a buyer for our old quarter panels so we needed to remove them intact. We needed to cut the quarter panels off at the welds and seams so they could be re-welded on the customer's car. We literally installed the damaged quarter panels on our car and then trimmed them for the fiberglass panels. Pictured here is the body prepped for the panel. It was necessary to leave a lip on the edge of the steel quarters so the fiberglass panels could be easily and firmly attach to it.

The fiberglass rear quarter panels are flared 2" over stock width. This picture shows the new panel being fitted to the car. We found that clamping the panel in place and applying heat to it allowed it to relax. We used an infrared heat light and hot air blower to achieve this. The panels would eventually be attached with 3/16" pop rivets around the perimeter.

The front bumper from GT has the light openings filled and their latest air splitter riveted to the bottom. It is attached with dzus fasteners to the fenders and supported on the front by two fabricated aluminum brackets where the bumper shocks used to be. The header panel (not pictured here) slips onto the top of the front bumper and attaches with dzus fasteners under the hood. We can quickly remove the front bumper assembly allowing it to easily load on a trailer and allow access to our fabricated tie down brackets for anchoring to the trailer.

Next we installed a 1/4" Lexan windshield and 1/8" quarter windows. The door windows are 1/8" Lexan and removable. The rear hatch frame is from a 924 with a 3/16" Plexiglass window. We added pop rivets around the perimeter and some aluminum stripping down the back glass to keep it in place. The 924 frame was our choice because we anticipate the use of a wing and this frame does not have the mounting holes for the stock rubber spoiler. We removed all hardware except the hinges. We used hood pins to secure it.

The car was then block sanded and prepped for painting. We selected 1996 Acura NSX pearl "spa yellow" as the main color. We used Standox paint for the final finish. The car will be getting stripes and lettering in short orders.